Showing posts with label Craft Products. Show all posts

Tuesday 27 September 2016

Guest DT Pavitra: Magnetic Mixed Media Note Pad

Hello Crafty Friends,

A very Good Morning to you all.

Again we are back with our guest DT in our Teaching Learning Program  and today its Pavitra with her stunning Mixed Media note pad. Everyone think that Mixed Media is hard but Pavitra showed in this  step by step detailed tutorial that how to compose it and get the desired results in Mixed Media.

Over to you Pavitra,

Hello Everyone!

I am Pavitra here, and what a feeling to be on this platform and sharing my work with you guys, thanks you so much Rainbow Craftykari Team for this opportunity .

Today! I am gonna share a mixed media project with you guys.
So let’s get started …..

I had a magnetic sheet which I got with one of the die and was lying as scrap, so I thought of converting the little one into something interesting.

Firstly I sized a canvas sheet to the size of my magnetic sheet and pasted it on top of it with the help of heavy body gel.


Once dried properly I applied a goat of white heavy gesso and again left it to dry, you guys can off course use your heat gun to speed up the process.
 

After that I stamped the canvas sheet with various stamps using black archival ink, here in you can use any permanent ink and can also experiment with colors to add more interested.


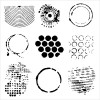
After stamping it’s time to add some texture and for that I used modeling paste with a stencil.  


For coloring my background I used distress sprays, working with them is super easy, quick and fun. I simply sprayed the distress sprays  directly on the surface and then sprayed water with a mister to let the color blend.
I left it to dry naturally and start working on my embellishments.
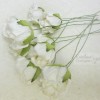

I used die cuts, stamped images and handmade blooms as an embellishment that off course shows how versatile dies and stamps can be, and how we can multi function with them. I die cut cardstock twice and stick the two pieces with clear glue to give it more strength and colored the edges with archival ink and later applied a coat of clear crackle paste.
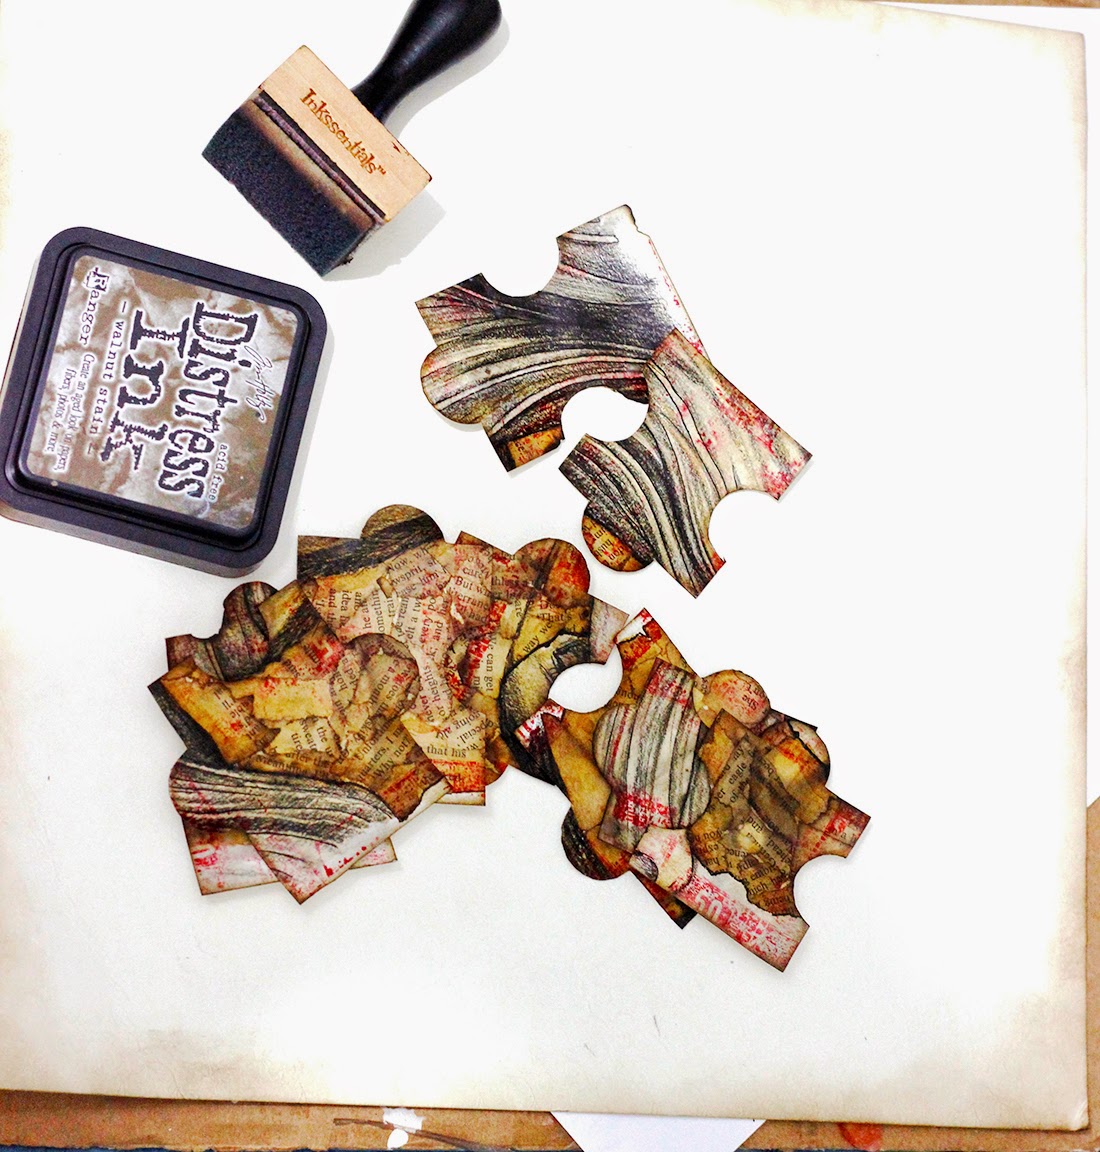
 

Once dried properly I sponged walnut stain on the entire piece for the cracks to become visible, here in I would like to give a advance always leave your crackle paste or paint to dry naturally, never heat set them with your heating tool as you will not get the desired results.

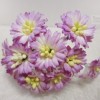
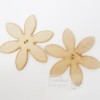
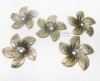
For coloring my blooms I used archival ink red carnation and shaped them with my embossing tools as shown in the picture.
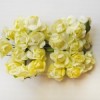


The yellow blooms are colored with archival ink saffron and also embossed the similar way, once I m done with all the blooms the dust them with diamond dust and clear glitter. I also used various leaf cutouts to compliment my blooms.


Finally I arranged my blooms on the magnetic sheet and also tied a twine to add more interest.

N
ow it’s time for finally assembly, I stamped a cage image and a sentiment with black archival ink and dust them with clear glitter for a shuttle shine.


And here is the finished project ready to be adorned in my room, since its magnetic it can be placed on any metal surface. I thought of writing some positive quotes on the pad and off course blooms are going to add on that only.
Some more close-ups 


Hope you enjoy it!!!

Take care, keep crafting.

List of supplies I used.

Magnetic sheet
Canvas sheet
Heavy body gel
Finnabair White heavy gesso
Finnabair white modeling paste
Archival ink – black, cobalt, red carnation, saffron
Distress ink – walnut stain
Distress spray – picked raspberry, fossiled amber, crushed olive
Distress clear rock candy crackle paint
Diamond dust
Distress - clear rock candy glitter.

Above listed Materials are available at Rainbow Craftykari Store or you can pre-order.

Regards

Tuesday 12 July 2016

Guest DT Shilpi Gupta: Punchcraft Sunflower Tutorial

Hello Crafters, What's up? Today I'm so glad to Welcome a crafter on our blog who is known for her Punchcraft Projects. She makes amazing and innovative Punchcraft flowers. Your mind will be blown away seeing such a beauties. Without taking much time, Let me introduce to you Shilpi Gupta from Shilps Crafts - Unique Handmade Gifts 

Over to you Shilpi 

Hello,I am Shilpi gupta. I am a software engineer by profession and a crafter by heart. I am married and have a 3 month old daughter. I started crafting 4 years back when I used to make greeting cards for near and dear ones at birthdays and anniversaries. My husband saw those greeting cards and motivated me to take it seriously and to look at it from professional's view. And then I started taking it more seriously, looking for YouTube videos tutorials, following blogs to become aware that such crafting world exists too in this world :)
I started with handmade cards then gradually progressed to flower making and scrapbooks. That day forward i never looked back.

I am so excited to be a guest designer at Rainbow Craftykari. This blog is full of inspirations, tutorials, pictorials, demos and what not. You name it and this blog has it. You will find all the basic and advanced information about the new craft products.
Though I use different kind of techniques in my crafting such as mixed media, scrapbooking, card making, flower making but I love to make different kinds of flowers more. So today I will be sharing with you all a detailed pictorial on how to make real looking sunflowers in simple steps. Girls grab your cup of coffee and sit back as this post is picture heavy.

Let’s begin:
For this we will use Heartfelt creations Classic Sunflower die.


1st step:
We will use 3 large, 3 medium and 1 small die cut outs as shown in picture to make one large size sunflower.


2nd step:
While distressing the die cut remember never apply or dab the blender directly on paper. Dab it lightly on the craft sheet near to the die cut and then in circular motion start moving the blender towards the die cut. Keep distressing the die cut in circular motion. This will ensure even spreading of ink without blotches or spots of ink.

 I have used Mustard Seed and Wild Honey Distress Inks here, we will color the cutouts/petals. Color the whole petal using mustard seed distress ink and apply wild honey distress ink just on the pointed petals of each cutout.

3rd step:
Now we will start embossing and molding the petals to make them look real. Take the smallest pointed embossing tool and make 5-6 parallel lines from outward to inward direction as shown in the picture. This will help in curling the petals on their own. I have used Leather perforating pad underneath for embossing.


We will repeat this step with all the cutouts so that all our petals are ready. And it will look something like this. As you can clearly see in the picture, petals are slightly curled towards the center and the embossing has given depth to the petals.


4th step:
We are almost done and now we just need to arrange the cutouts to make a complete sunflower. We will glue down all the cutouts in offset position one upon another. Two petals should not be overlapping each other while arranging the cutouts. For gluing we will use Aleene’s Tacky glue. Its best glue to be used in punch craft and flower making.


After arrangement of all the cutouts, this should look like the below given picture.


5th step:
And the last step is to complete the center of the flower. I have used mustard seeds for the center as it gives that perfect natural look to the sunflower. You can also use brown glitter balls.

Note: Use transparent adhesive to stick the glitter balls to the center. I have used Inkessentials glossy accent. It is strongest and transparent in nature.

And here is your completed sunflower. Isn’t it beautiful? Blooming as if just now plucked from the garden.


It is rightly said flower is not complete without a leaf. Here we will also see how to make leaves for this flower.

6th step:
We will take punch cutouts using lily punch. You can use 100- 120 gsm colored cardstock available easily in Rainbow Craftykari Store. I have used 100 gsm dark green colored cardstock. You can also use 150gsm white iris sheet and then distress it using desired color.


7th step:
We will emboss these leaves in the same way as we have embossed flower cutouts creating vertical lines.


Are these sunflowers and leaves super easy to make? So our flower and leaves are all ready to be assembled on a card. And here we have our finished card.


 I have used RTV Clear silicon glue to adhere flowers and leaves to the card base. This glue is my first choice because it gives me ample time to arrange my leaves and flowers. It takes around 30 mins to set permanent. Unlike hot glue gun which dries as soon as it comes out of the gun which makes it impossible to rearrange the flowers and leaves in case one does not find it pleasing to the eyes.


Hope you all liked the tutorial as much I do. You can leave your queries in the comments section and we shall get back to you.

List of materials used:

Heartfelt Creations Sunflower Die
Distress inks Mustard Seed and Wild Honey.
Embossing tool.
Leather perforating pad.
150 gsm iris paper
100 gsm dark green colored cardstock
Inkessentials Glossy Accent
Aleen’s tacky glue
RTV Clear silicone glue

You can find these products at www.rainbowcraftykari.in

Thursday 16 June 2016

Guest DT Mansi Gupta: Mini Accordion Fold Album Tutorial

Hello Crafters, We're back with totally fresh batch of craft posts and we will make sure that you will going to learn and experiment new techniques through our DT's. Today we have came up with informative post on Mini Accordion Fold Album. Let me introduce to you a crafter who is Crafter by Heart, loves to Travel and Relish adventurous sports. She's into Scarpbooks, Decoupage, Volume Decoupage, Paper Craft, ceramic work, Collage clay and much much more. She is Mansi Gupta from Glitzern
Over to you Mansi
Hello Crafters,
Hope you all are doing well!!
Sharing a small tutorial on Super mini album in Accordion fold style. You can use this for anniversaries, birthdays, showers or any simple photo album. It is easy and cost effective to make. It measures 3.5 * 3.5 inches. Hope you will enjoy making it.


Material Required:
1) Chipboard/ Cardboard- 3.5* 3.5 iches- 2 pcs
3.5* ¾ inch- 1 pc.
2) Designer pattern paper- 3*3 inches- 11 pcs
3.25* 3.25 inches- 2 pcs
3.25* 1.5 inch- 1 pc
3) Black cardstock- 3.25* 19.5 inches- 1 pc.
4) Ribbon
5) Stamps and embellishments. 


First Step:
Score the black cardstock at the interval of 3.25 inches, and fan fold it. Our base of folded album will be ready.


Second Step:
Place the chipboard pcs on black cardstock and fold the ends making book like structure. Don’t forget to leave a little space (approx. 2mm) between the 3 panels. This space helps in folding the flaps. Stick the patterned paper inside the book, and keep it aside.


Third Step:
Now take the Fan fold strip and stick pattern paper pcs on it randomly using Aleene tacky glue or your favorite glue. (You can always increase the number of panels by sticking another black cardstock to it). Cover all the sides, front and back, except for the panel on the top.


Forth Step:
Now Paste the ribbon and the 3.25 inch sized pattern paper on top of book, paste the small pattern paper on spine to finalize the base of your album. Now with blank side at bottom, paste the album panels inside the album and yippee, your album is ready. 


Fifth Step:
Now this is my favorite step. Embellishments.
Use Sentiments, flowers, or any other decoration. I like to create a layer and keep it Simple. Here is the final look. Hope you enjoyed and understood this step to step process! Good luck and keep making more!!


List of Materials Used:
Papericious Paper Pack - Littel Star
Black Cardstock - 220 GSM
Chipboard
Ribbons
Mulberry Flowers
Embellishments
Aleene Tacky Glue

Sunday 29 June 2014

Guest DT Bipasha: Altered your Drawings, MDF & Cage using Beeswax and Spellbinder Media Mixage


Heya Crafters, Whats up new going? Well Today we have came up with amazing post on Mixed Media. Let me introduce to you a crafter who is an electronics engineer. Her passion for art and craft is totally unending. She's always surprise us with her out of circle imagination and her drawing skills are incredible. She is Bipasha from Bk's Creative Corner
Over to you Bipasha

Bonjour my dear crafters!This is Bipasha from Bk's Creative Corner.At the very outset, I would like to thank super talented Maninder for giving me a chance to be a Guest Designer for my very favorite Rainbow Craftkari Blog and the super gorgeous GDT kit :),believe me the very moment I unpacked my parcel,it left me in complete awe and admiration for each of the products,specially the wooden embellies, metal findings,the Spellbinders Media Mixage ! Gosh I was dreaming of all crazy creations :P !!

It's a  little lengthy picture heavy post,so get a hold of your favourite drink and have fun going through the post :).

I will be sharing three projects with you and two techniques of fun experimentation with Beeswax!

Project 1: #Making a collage with beeswax(clear) (technique A),Colour me Crazy-Petalloo flowers, canvas board and some metal charms.

Instructions:

(Melt Art is way beyond fun! It’s super easy to experiment with all the cool (or should I say hot?) meltable mediums when you have the Ranger Melting Pot, no doubt.But who says you can't play with beeswax unless you hav a melting pot ?)

To work with the bees wax,I wanted a strong image to use as the focal point for my collage, and followed a few easy procedures to make it real grungy.
I sketched my image with charcoal pencils, then mod podged an old dictionary paper torn-outs(distress inked the edges while doing so) as a mask for my "grungy lady",and finally used coffee to give little effect to the entire image.


Now the image was ready for the real experiment with the beeswax ! To add little drama, I cut out my entire image into pieces alike those of puzzle games, and distress inked the edges.Then I stamped on random areas of the pieces with my red momento ink.


Then,I placed some beeswax pellets on each piece and ironed it out with my craft iron. Can u see lovely, foggy ethereal quality added by the wax to your surface and oh, the texture!


Next, i distress inked the edges of the canvas board using Walnut Stain


My next job was to make some co-coordinating embellishment for my grungy lady ;)! So I distress stained,stamped some of the awesome color me crazy petaloo flowers. The best part about them is they are so easy to stamp, ink, or mist. Take out a mat and "color" away, to make one-of-kind, beautiful embellishments in seconds.

Once they were ready, I started working on the rest part of my collage and stamped and pencil-colored the area to create of my favorite dimensional brick look.


Once I was quite happy with placements and layouts,I glued down the accesories and voila!! My grungy lady is all ready for the show :) 


Project 2 : #Making a penstand with the amazing MDFs,decouplage napkins and beeswax(clear) (technique B).

(My entire idea was to make it a little shabby-chic and also add a little vintage-y touch to it.So I selected the colour scheme as pink,black and slight brown vintage old touch *here and there. Hahaa, well the "here and there stuffs" will be stressed more in the below instructions though ;)
Instructions:

I separated the stuffs required for the primary base look of the pen stand. I thought of decoupaging it with the wonderful napkins from the store.I mixed a little paint and gesso and colored the entire mdf stand, giving it a creamy pink tint.

After the basic coat dried up completely, I decoupaged the napkin with mod-podge. In other cases, I would have preferred to roll out the wrinkles created on the napkin with a roller or a damp sponge before drying, but I left it as it is for this project, I loved the worn un-neat look!I stamped the visible edges of the stand with bo-bunny stamp and momento inks.


I collected two random stamps and planned to use them as embellishments! yes I mean postal stamps and i'm going to use it as embellishments. I distressed the postal stamp with Vintage photo stain and applied melted clear Beeswax, its worked out the perfect magic. I used a simple lighter to melt the wax and create a faint aged texture. I feel they look perfectly aged and gorgeous !


Finally, I added a few textures with Modelling paste(add a little pink tint) and gessoed + stamped few mdf embellishments to co-ordinate the entire project.


And we are done ! :)


Project 3 : #Making a dangler with the Spellbinders Media Mixáge.
Instructions:
(I have long been a fan of Susan Lenart's eclectic style, her embellishment range always blew me away and this Spellbinder Media Mixage is not an exception !)
I had seperated some of the assemblies(flowers,mini beads,etc) that I thought it might go well with the project.

(I have cut out co-ordinating pieces from the printable's and glued them inside the Spellbinders Media Mixáge bezel. Squeeze Dimensional Magic over the paper in a thin, even layer, creating a slight dome. Starting around the edges and spiraling inward, filling in any gaps.Use your finger or a toothpick to pop any air bubbles, then let the glaze dry in place (about 24 hours), allowing it to cure.If necessary, prop the bezel so that it will lie flat and level. (If you don't have dimensional magic mod podge, you can apply beeswax to give a textured look or you can apply Ranger Glossy Accents)


Finally, when it is cured, attach any embellishments desired such as metal charms,flowers etc. to give it the finished look !


My links:


Craft Materials: