Showing posts with label Gift Box. Show all posts

Friday 29 September 2017

Quick and Easy Chipboard Box Tutorial by DT Khushboo

Good morning Crafters!

Hope you're having a good day so far. Khushboo here with a new tutorial post at the blog today.

In our field of work, boxes play as important a part as our projects. But finding a box that fits our project is a mammoth task - and an impossible one at that! To solve that problem, today I'll teach you how to make a chipboard box from scratch! With this technique, you'll be able to make a box of any size - according to your project! So let's get on with this tutorial where I list out how to make a 4x4x2 inches chipboard box.


Step 1:Take a 900gsm chipboard and cut out these sizes - one 4x4 inches piece (for the base) and four 4x2 inches pieces (for the sides).


Step 2: For the lid, cut these sizes: one 4.25x4.25 inches piece + four 4.25x1 inches pieces (ignore the sizes on the pieces below).


Step 3:For the lid, cut a cardstock measuring 7.5x7.5 inches and stick the chipboard pieces cut for the lid as shown in the pic below. Always leave a gap of 1/8th of an inch between all the pieces around your base piece (4.25x4.25 inches).


Step 4:

Now this is a slightly tricky part, but once you get the hang of it, it gets really easy. Make a slit along the corners of the cardstock - next to the chipboard that covers the sides (as shown below). Make sure that all the slits follow a clockwise direction. Next, trim these slits at an angle from both the sides - the way you do when you want to make a cover for your scrapbook album.


Step 5:

Apply your double-sided tape or glue (whatever you're comfortable with) as shown below.


Step 6:

Now, start first by folding the cardstock onto your side chipboard pieces (as shown below).
Step 7:

Now what you're left with are the long slits that you made. Every long slit will be wrapped outside the side chipboard piece as shown in the pic below.


Step 8:

Wrap all the long slits along the outside of the side chipboard pieces and you should get a box that looks like this:


And the top looks like this:


Step 9:

For the base of the box, follow the same steps - from step 3 to 8. The cardstock that you'll need for the base measures 9.25x9.25 inches. Your box now should look like this:


Step 10:

Now we advance to making our box more secure and clean. For this, we need hinges or structure strips, call it whatever you want. These will go at the base of your box, the lid, and the corners. You will need to cut your cardstock in these sizes: four 4.25x1 inches pieces + four 1x1 inches pieces - for the lid. For the base, you'll need: four 4x1 inches pieces + four 2x1 inches pieces. 


Step 11:

Score them at half an inch and add double-sided tape on them (as shown in the above pics). Next, cut these strips at an angle as well (as shown below) - the way you would do for your hinges in your scrapbook album.


Step 12:

Start by sticking these at the horizontal corner as shown in the pic below.


Your small hinges run along the vertical corners as can be seen in the pics below.


This was the final step in making your box. Now you can get to decorating it - by adding pattern papers. Always remember, to cut your pattern 1/8th of an inch less in size from all the sides than your box. For e.g.: for your 4x4 base - you will need to cut your paper that measures 3.75x3.75 inches in size. And for the sides - you will need to cut it at 1.75x1.75 inches.


And Voila! My finished project looks something like this!!!

Since you guys are already well-versed with how to decorate and embellish a project, I will briefly take you through how I did mine. I cut my pattern papers 1/8th inch less (from all sides) than my chipboard sizes. I stuck the papers all over - the top, the insides, the base, the sides. Then I collected some coordinating flowers and embellishes. I stuck my cycle die-cut first; and then kind of 'droppingly' placed my flowers. The prominent red roses that you see on my projects are from the Rainbow Craftykari Store and trust me guys, these are to die for!!! They look so darn yumm and gorgeous - I just HAD to use them in my project!
I then took some sentiments and designed pieces and randomly stuck them on the sides of the lid - I felt that gave quite a whimsical character to my box. I then balanced out the empty space with some pearls - without overdoing it! Hope you guys enjoy these close-up pictures of my finished project!


Materials used:

  • Chipboard 900 gsm
  • Cardstock
  • Pattern Paper
  • Double-sided tape
  • Glue
  • Flowers
  • Fillers
  • Die-cuts
  • Pearls
  • Sentiments

Hope you guys enjoyed my creations and the tutorial. Can't wait to see how you add your own twist to this!


Above mentioned products are available at Rainbow Craftykari Store OR you can pre-order the products by sending email at rainbowcraftykari@gmail.com

That's it from me, folks!

Signing out,
Khushboo R. Gandhi

Thursday 14 September 2017

Money Box Envelope Tutorial by GDT Vinita Jain

Hello, crafty Friends!

Vinita here, and this is my first GD post, at Rainbow Cratykari! I am so thrilled and will be showing you a project to inspire you with the Month's Challenge!!! Thank you Maninder and the Team! Today, I am showing you an envelope box gifting idea for a newly wed couple!


I created a money box envelope using a lot of mixed media products, a card and lot of journaling tags for pics and writing messages!!! And I had so much fun making them very first time! 😊

This creation is inspired by this month's beautiful mood-board which has these tropical colors, patterns, and textures, wood grain effect, different leaves in green hues!


Let's see how I made this: 


The envelope box is a pre cut template. And I decorated the front cover in Mixed media style! I took a honey comb stencil and applied paste. I then, randomly stamped some script for the style!


These are chippies from Papericious which I heat embossed with various embossing powders.


I die cut some different size leaves in various shapes. I used foam flowers and I highlighted the center of the flowers with some golden glitter applying clear glue. I die cut the word 'congrats' from 3 different shades(2 each) to make a stack.


The cover is not complete!


I added a lot of journaling tags measuring 7.5"X 3.8" in size using Martha Stewart scoring board. You can fit a beautiful decor and choose the most memorable pics to add the tags with handwritten messages to make those moments more precious.


This is a card for newly wed couple. I embossed it and highlighted only two big rose flowers using my watercolor pencils. Then embellished it and added a die cut sentiment.


This is inside view for the message and some heart tags, I stamped the sentiment and heat embossed it. Using Resist technique, I gave it an ombre effect inking. 


Using a border Die I cut those panels for one of the journaling tags.


I then covered it with PP, attached some doily, added 3D stickers and die cuts!


This is the back part of the envelope box.


Supply list:


  • Cardstocks and different papers: White Ivory sheet, golden glossy sheet, Light green sheet, Pattern papers, golden glitter foam sheet, green foam sheet,
  • Envelop box: Pre cut in yellow color
  • Dies: Crochet doily from Prima; Mr. and Mrs, Congrats(celebration words) and rectangle dotted framelits, framelit dies set tags from Sizzix; Multi Heart frame from Nellie's; Pierced hearts from Spellbinders; flourish #13 from Cheery Lynn; wild greenery from Die-namics; Gemini die-Orion from Sue Wilson
  • Stamps: Ever after from Kaisercraft, Handmade collections, script from Prima
  • Stencil: Mini honeycomb from TCW
  • Embossing Folder: Rose from Crafts- Too
  • Inks: Distress Ink- Fossilized amber, vintage photo, lucky clover; Jet black Archival ink
  • Embossing powders: opaque bright white, primary lemon, Earthtone mint, silver bells glitter, metallic gold sparkle from Wow
  • Versamark watermark ink pad
  • Texture paste: Ranger
  • Theme based chippies: Papericious
  • Misti
  • Martha Stewart Scoring Board
  • Watercolor pencils from Staedtler and water brush pen
  • Swirl sparkle gem stone self-stick  from Itsy Bitsy
  • 3 D Die cuts and stickers from Eno greetings
  • Layered Chipboards: Tags WeRMK 
  • Washi tape: Golden glitter
  • Glue
  • Round blender
  • Brown pen from Stabilo fine 0.4
  • Black coloring brush pen from Koi
  • Plastic palette knife


Above products are available at the RainbowCrafykari store or you can pre-order them by sending an e-mail at rainbowcraftykari@gmil.com


I hope you enjoyed my latest creation and are inspired to participate at Rainbowcraftykari Challenge#5!


Have a wonderful day!

Vinita

Friday 18 August 2017

Altered MDF Box by DT Priyanka Thukral

Hello Everyone, :)


I am at Rainbow Craftykari Blog today to share my very first inspiration post as the DT member for Rainbow Craftykari. I am Elated..!! and I hope to stand up to the expectations laid down on me.


Today I have an Altered MDF wooden box to share as a part of my inspiration project.
Altered MDF projects have been my favorites since forever & no wonder I begin my term with one of these.


Here is the complete picture of my project


For this project, I picked up a hexagonal MDF box (another current favourite of mine.. :P ) I began with painting the base with gesso which works as a primer (tip: Gesso creates a coat on the base of the wooden material that holds the paint otherwise the wood absorbs the colour).


Next, I painted the box with blue acrylic colour. I chose coordinating patterned papers from Eno Greetings paper pack, cut them to the desired size & distressed them on the edges. For the cover, I cut the paper from one end to the centre point & rolled the two sides on the opposite sides.

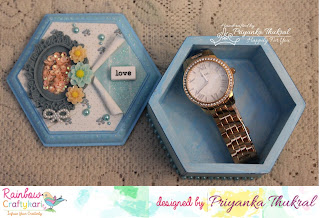
On the exposed part of the base, I added glitter using stickles in the coordinating colour & a word tile over it. On the other part, I added a resin oval frame & sequins in the middle of it & adorned it with the resin flowers & bows.
On the sides, I again used stickles in the same colour to give an embossed look (I love how they look like tiny droplets resting on the edge) & added rhinestones to lift up the whole look.

and tada..!! the box is done... :)

The box is perfect to gift a watch to someone or keep it on your dresser as a jewellery box, can be used in multipurpose ways.

Check out some more close up pictures


Supplies Used: 

  • Mdf hexagonal shaped box
  • Gesso by Camel
  • Blue Acrylic paint by Fevicryl
  • Eno Greetings- Pattern Papers
  • Word Tile
  • Resin frame - Oval
  • Resin flowers
  • Bow
  • Stickles(aqua colour)
  • Rhinestones
  • Distress Ink
  • Glossy Accents

Above-mentioned products are available at Rainbow Craftykari store or you can also pre-order by sending an email at rainbowcraftykari@gmail.com

Don't forget to participate in our ongoing challenge Rainbow Friendship. Link your projects here.

Hope you liked my project!


Priyanka Thukral