Showing posts with label Papercrafting. Show all posts

Wednesday 20 June 2018

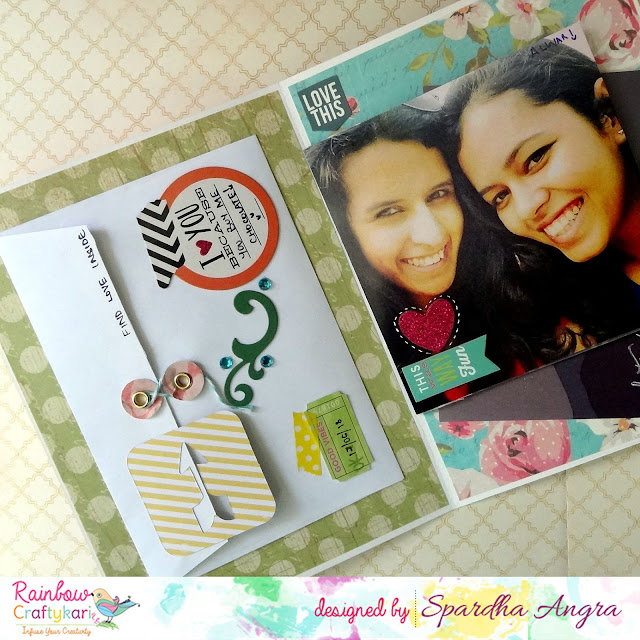
Snail Mail Video Tutorial by DT Spardha

Hey guys!

Hope you’re enjoying the last few weeks of summer vacay.
Still super hot in Delhi, but it also means bright and shiny summer colours :)


Today I am going to share with you, one of the trending
DIYs, so much fun to make… *drumroll*… Snail Mail Folder!
I have made a tutorial video to show you how fun and easy it is to make one for yourself. And there is SO MUCH you can do


Gone are the days we used to send out mailers, although postcards are making a
comeback so *YAY*


Snail Mail Folders are basically a more elaborate version of a card you’d like
to send out. It’s got more material, pockets for secret messages and space to
add your photos to. It’s an entirely personalized folder for someone you’d like
to send out some love to.


I made one using my photos with a friend, my long-distance
friend, Asha. She’s a fellow architect and post our college together, she has
moved to Germany to work *sobs*

So, this folder love goes straight to her mailbox!


I hope I have inspired you to make one for someone you love. And if you’d like
to share some love with our beautiful design team, we won’t say no! :)


Supplies List:
White Cardstock
Patterned Paper{Eno Greetings}
Vellum
C5 sized envelope
Golden eyelets
Glue Gun
Hole Punch
Eyelet setter
Bakers twine
Paper clip
Stickers
Rhinestones
Paper doileys

Above Materials are available at Rainbow Craftykari Store or you can pre-order them by sending mail at info@rainbowcraftykari.in

Don't forget to
check out our ongoing challenge. Few days left to participate in our current challenge! Grab a chance to win Goodies more than worth Rs 400/- from CrafTangles !!
Hugs
Spardha


--- Happy Crafting! ---

Monday 4 September 2017

Love- Photo Frame by DT Mounika

Hello everyone,

I am Mounika and I am so happy to be on Rainbow Craftykari Blog with my Inspiration Post.


Everyone loves to treasure memories in a special way, and if those memories are with our kids they are all the more special! To treasure such special memories with my son who will turn 3 this August, I  made this frame.


To begin with, using Papericious black gesso I primed the frame. I then traced down the shape of the frame on a piece of pattern papers and cut it. I have used the Aazealian paper stack from Papericious's latest collection. I then stuck down the pattern paper and cut down the extras. To add some texture I used a bubble stencil with texture paste. Once it was dry I took small pattern papers and roughly arranged them. Once I was happy with the arrangement, I glued everything down. For the embellishments, I used a chipboard heart coloured using blue and yellow chalk paint. On the yellow hearts, I added glitter.


The main focal flower was made using Heartfelt Creations Arianna Blooms stamp and then shaped, the "love" sentiment embellishment was coloured using Prima Art Alchemy waxes. I used the same on the frame as well to highlight the texture at places. 


Here are some close ups:


Materials used:

  • MDF frame
  • Papericious- Black Gesso
  • Papericious- Aazealian Paper Pack
  • Chipboard elements
  • Prima Art Alchemy Waxes
  • Fine Glitter
  • Mulberry flowers
  • Fillers
  • White glue
  • Chalk paints
  • Bubble stencil
  • Texture paste
  • Brushes
  • Microbeads
  • MDF embellishments


All the products used available at the Rainbow Craftykari store or you can  pre-order them by sending an e-mail at rainbowcraftykari@gmail.com

Don't forget to participate in our ongoing challenge. Link your projects here.

Hope you're inspired to create!


Happy crafting
Mounika

Monday 3 April 2017

Starburst Card Tutorial by GDT Neha Lunia

Bonjour Crafters,

Hope you all are doing good. It's an April month and Summers are approaching, So don't let the summers take away your MOJO. We have a way to bring out your mojo back.
Today, Our GDT Neha Lunia, in our Teaching and Learning Program, will be going to teach an detailed card to gift to your loved ones. Let's get started!!

Hi Crafty Folks,


This is Neha here with my first GDT post. I would like to thank Rainbow Craftykari Team and Maninder Kaur for giving this awesome opportunity to work with them. We all do have lots of pattern papers which are half used. So, this card is perfect to use them up. Today, I have tutorial post for creating this addictive and super easy “Starburst Card” with very few basic materials.


1. Let’s get started by cutting the pieces required for the card.

   1 piece of 3 ¾ * 3 ½ “cardstock

   1 piece of 3 7/8 *5 ¾ “cardstock

   4 pieces of 4*1 ½ “Pattern Paper (of your choice)

   1 piece of 2*3 ¾ “Pattern Paper


2. Cut each of 4*1 ½ “of your pattern paper diagonally by lining the edges up on your paper trimmer.


3. Place 3 ¾ * 3 ¼ “cardstock on your scoreboard along the long side. Mark on centre at 1 7/8” with the help of pen/pencil. Rotate 180 degree and repeat the same.


4. Apply glue all over on your 3 ¾ * 3 ½ “cardstock.


5. Line the pointed tip at the bottom and top of marked centre points. Once you have first piece in place then you can start adding other strips. Keep going and play around the combination.


6. Trim off the excess edges and you have your starburst ready.


7. Mount your starburst onto the 3 7/8 * 5 ¾ “cardstock. Line up your 2* 3 ¾ “of Pattern Paper below the starburst with help of any adhesive of your choice.


8. Place 8 ¼ *6” cardstock on your scoreboard with the long side on top and score at 4 1/8” and fold along the scored line.


9. Mount your starburst onto the folded card with help of adhesive. Decorate the card with die cuts, laces, trims, flowers or sentiments as you prefer. Here, I have used my designer scissor and strips of plain cardstock to make the trim. I have punched few small 5 petal flowers and leaves. Have shaped up the flowers using embossing tool (you can also use rounded back of your ball pen). Lastly, have completed the card with cutting off sentiment from the same paper pack.


Hope this tutorial has inspired you to use some of your scraps of card and paper. Do share your creations with us at our FB Page

Material Used:

Plain Cardstock

Pattern Paper (Eno Greetings)

Adhesive

5 petal flower and leaf punch

Embossing tool

Half cut pearls

Designer Scissors


All materials are available at the Rainbow Craftykari store and you can also get them on pre-order.

Dont forget to participate in our Second Challenge "Exploding Surprise" currently going on at our blog here


Warm Regards,

Neha
Craftmaniaa

Saturday 1 April 2017

RCS Challenge # 2 - Exploding Surprise

Hello Crafty peeps


This is NIkkita Sethi back again at Rainbow Craftykari blog with an exciting challenge for the month of April.


This month you have to create an explosion box with a twist and the Guidelines are:

  • Create any kind of explosion box and on any theme.

  • The explosion box must have minimum 2 layers and you can goes upto as many layers

  • The Explosion box must have an 3D object in the center. It could be cake, small jewelry box, silhouette or anything.

  • Your Project must be NEW. 

  • The explosion must have an flower either inside or at the top cover, It could be  handmade flower, fabric flower or mulberry flower. You can include as many

  •  You must use minimum 2 colors from the color palette given below and Maximum 5 colors from the palette, Other shades can be used but very minimally


Please go through General Guidelines and Rules HERE. Any entry which won't be following the guidelines, will be disqualified and will be removed by the participation entries.


Rainbow Craftykari will be giving TWO Prizes for this month -

  • One Winner will be be selected by the DT and He/She stand a chance to win Gift Voucher worth Rs 400/- from Rainbow Craftykari Store.

  • Second Winner will stand a chance to win a Papericious  6"x6" paper pack

  • Top 3 entries will win Rainbow Craftykari badges. 


*Above given guidelines are mandatory to qualify in the challenge. If any participant fails to follow the guidelines, they will be disqualify from the challenge.


It's an easy least challenge.

And for the inspiration I have created my version of explosion box. I have used "blush" collection papers from Papericious for my explosion box and made it on love theme. Love is a beautiful expression it makes one feel emotionally connected to ones who are special to us. The blush collection papers goes perfect with he challenge theme and it's specially designed for romantic theme as well. It has some vibrant, dreamy designs which goes well with the two layers and a garden of love as a center piece element in the middle of the box. I have used two main shades from the color palette and have given the slight touch of dull light yellow.


Open the box and be pleasantly surprised by layers of beauty, full of mystery and surprises.


Here is the Inspirations by our DT's and GDT's


Floral Explosion Box by GDT Karthikha

I wanted to do an explosion box that will suit any occasion, be it birthday, anniversary, love, etc. So the best option was floral! I've used all the colors from the color palette for the challenge. The different shades are seen in the patterned papers and flowers used. For more details check here https://tinyurl.com/lsmwq95


Birthday Double Surprise Explosion Box by DT Aditi Mahajan


The first box, opens to one layer, with triangular pockets (made using pearlescent cardstock and Martha Stewart border punch) in the pack on the four flaps to insert photos. We've decorated these with some flowers. Inside this, is a smaller box, that opens to two layers and a decorated 3 D cake inside. I've decorated the inside with flowers, and some sentiment words like beautiful, love, enjoy, etc die cut using sizzix dies (on cardstock). I've followed the colours of the challenge for this creations. Some embellishments have been fussy cut from the sheet in the paper pack. The patterned paper was distressed before adhering to the base. Check Details Here https://tinyurl.com/m2w42f2


Shaker Blooming Explosion Box by GDT Richa Maurya


I created this explosion box using Papericious “If Only” Collection. This explosion box can be a present for anyone you love. I have kept the theme floral and have added lots of flowers and butterflies. For Details Checkout here


Link up your projects through Inlinkz before 30th Apr'17
Excited to see your projects
All the Best !!


Wednesday 29 March 2017

Floral Vintage Box Inspiration by GDT Khushboo Gandhi

Heyloo guys! I'm so excited to be here! This is my first ever post for Rainbow Craftykari Blog and I'm extremely thankful to Maninder for this amazing opportunity.


For my Inspiration post this time around, I have a plain chipboard box that I altered and transformed into a completely elegant and floral keepsake box. We can find tons of posts on 'how to construct boxes and albums' all over the web, but it's equally important to focus on 'how to embellish' something. And so, for my post, I'll be highlighting certain features of 'how to decorate a box with a cohesive theme' + certain distress ink techniques to get a vintagey and bright look (for both the outside and the inside of the box). 


I had so much fun embellishing this box. It's so amazing that crafting is such a versatile art - we can create whatever we want, and decorate it the way we want to.


Brief Steps for 'How To Embellish A Box/Project':

1. First of all, decide what theme you'd like to go with - floral, vintage, fun, eccentric, classy, monochrome, etc. It could be any one, or a mix of a couple of themes together. For this box, I've chosen a Floral theme with a Vintage backdrop.


2. The trick (to be able to work well during your embellishing stage) is to gather all your supplies that resonate with your theme - floral/vintage pattern papers, flowers, box corners, metal embellishments, pearls, inks, fillers, etc.


3. Decide what pattern papers go well with each other, try and determine which design would go better for the top and the sides, the inside of the box and the outside. Contrasting your design papers and colour combinations is one of the strongest points in embellishing your project.


4. I went with an intricately designed paper for the top (since it's the first thing anyone notices) and I used simple designed pattern papers for everything else. 


5. I cut all the papers 1/4th inch less than the size of my box and went ahead and stuck everything in it's right place (leaving 1/8th space all over). The effect that you get when the background cardstock peeps through that 1/8th inch is absolutely enchanting!


6. I then added my metal box corners to the lid, some pearl trims, and loads of flowers on one end of the lid. I also added a clock embellie with some stickers, especially the one that said 'Traditions'.


7. For the front of the box, I added a 3d sticker on which you can write your name or a message. I also added some resin corners.


8. For the inside of the box, I contrasted it and kept it really simple (since the outside is so full of life and heavily decorated). 


Some Distress Ink Techniques to get you going on that beautiful Vintage look:

1. If you notice, all of my pattern papers on the outside of the box have an aged, brownish, vintagey look. To achieve that, I simply used an ink applicator with Tim Holtz' Distress Ink (Tea Dye) on my papers, moving it in different directions (circular, random, straight).

2. Since papers age/become yellowy/brownish in random places over the years, the idea is to replicate that look with random strokes of inks - so that our paper looks as naturally 'vintaged' as possible.

3. For the inside of the box, I used Picked Raspberry for the bottom and Peacock Feathers for the sides (keeping the contrasting colours in mind). I tried to create a vignette using these colours that I applied on all 4 corners of the paper in a circular motion.


Supplies used:

Tim Holtz Distress Inks

Kirby Teesdale Studio Paper Pack

Pearl Trims

Resin embellishments

Flowers

Metal box corners

Papericious clock sticker

3d stickers

Glue


You can find all the above mentioned supplies at the Rainbow Craftykari Store or you can pre-order them by sending an email at rainbowcraftykari@live.com

I hope I was able to inspire and motivate you enough to go try your hands on embellishing a project today. Don't forget to share your pictures!

Warm Regards
Khushboo Gandhi